

Small steampunk chimneys from junk
 A special english language (I hope it is...) recap tutorial of how my steampunk chimneys were done.
Materials:
- two tubular medecine tablets containers,
- two parts from the spouts of fruit juice bricks,
(tear the spout from the brick. It is two-parts. One of them has spiky things and looks steampunk enough for me)
- an old Mage Knight miniature cavalry base,
- pollyfilla
- sand
- superglue
- PVA glue
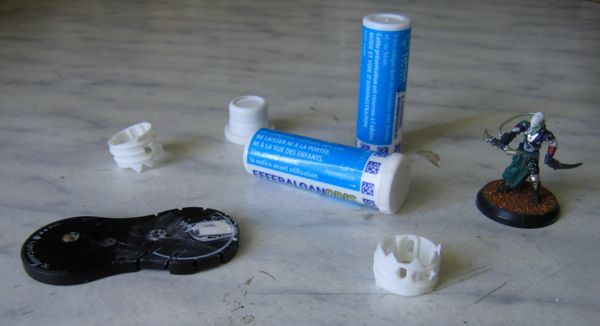
One of the tablet container had its cap removed, to be of a different height than the other. The "combat dial" of the clix base was filled with wall filler. There had been no need to even cut anything. The only time a blade was (very carefullly) used was to remove the miniature (which was converted for another project) from the base.

Everything was glued using Superglue (gel).

Both chimneys were painted separately because it was easier. Then the second one was superglued to the base. Sand was then added to the base using PVA glue.
I used GW Mat varnish (the "for brush" version) as a primer. I found that it woks well on plastic, including "prepainted miniatures".
Metals: Prince August Gold with Sepia and/or Sanguine inks (Colorex, Pebeo).
Verdigris: Hawk Turquoise GW + old GW green ink + some colour close to GW Snot Green (?).


This scenery element is meant to stay as it is, modular, so I can use it in different settings. Like on a building, or on the floor.

For other recycling projects for miniature scenery, go read : Terrain from Junk.


/http%3A%2F%2Fstorage.canalblog.com%2F39%2F05%2F79248%2F55942334_o.jpg)
/https%3A%2F%2Fstorage.canalblog.com%2F15%2F56%2F79248%2F132253155_o.jpg)
/https%3A%2F%2Fstorage.canalblog.com%2F77%2F32%2F79248%2F132350199_o.jpg)
/https%3A%2F%2Fstorage.canalblog.com%2F63%2F02%2F79248%2F131919017_o.jpg)